Mass-producing quick thank-you cards
Hey, everybody! Today I wanted to share how I make lots of cards at once for thank-you's. I frequently make large bunches of these, as I send a handmade thank-you to all the customers who purchase a car from me at work. So I need them to be unique, fun, and quick- selling cars means lots of thank-you's! This is a quick way I found to make lots of cards at once using the Triple-Step thank you stamp from Concord & 9th.
There are so many variations you can make with this stamp and die set- it's amazing!
To make these, you will need:
-White heavy-weight cardstock (whichever you prefer)
-lots of fun colored ink pads, I used my Ranger Ink Tim Holtz Distress Inks and loved how they came out.
-Concord & 9th Triple-Step Thank you stamp and matching dies (Available for purchase here: https://www.scrapbook.com/store/con-10427.html?w=Concord+and+9th+triple+step+thank+you however, I got mine from one of my favorite online craft retailers, Kraftgali. Shes not stocking them any more so I linked to one of my other go-to crafty places!)
-some sort of stamping tool, like the Tonic Studios stamping platform that I have, or a misti. This isnt necessary if you only have stamp blocks but it really improves the effiecency and quality of stamping with this set over all.
-Die cutting machine for the matching die set, not necessary but makes cutting out a bunch much quicker than fussy cutting!
-embossing folders for the backgrounds, I used a variety of "what I already have" folders to change them and add interest to the backgrounds.
-sequins, rhinestones, and whatever other embellishments float your boat for decorating
-glue for your embellishments. I always use Ranger Ink's Matte Collage Medium for it's great hold and completely invisible appearance when dry. You can find it here: https://www.kraftgali.com/collections/ranger/products/tim-holtz-distress-coage-medium-1oz
-paper towels, baby wipes, or a microfiber cloth for cleaning stamps
-double sided tape
-foam adhesive (dots, strips, tape, whatever you have)
 Okay, let's begin! First, stamp the first layer of the stamp set in whichever color you choose- I did Ranger Ink's Wilted Violet first here. Usually, I've found that going from the T-K-O part, to the H-N, and finally to the A-Y-U part allows me to line up my stamps the best.
 Line up the next layer in your stamping tool, making sure it's nice and straight, and then stamp it in your next color choice.
 I used Ranger Ink's Twisted Citron in this example. Make sure you clean your stamps in between! Then, line up the final part with the stamped image, and stamp it in your next color.
 I used Ranger Ink's Mermaid Lagoon for the blue you see here.
 The stamp is that easy! Now, I showed you one at a time, but normally, I do them four at a time, rotating my paper and stamping each corner with each layer.
 This makes four cards in the time it would make to make one anyways!
 Remember to clean your stamps through this, especially if you're doing too color combos at once as I did. If you positioned your stamps correctly, you should be able to rotate, stamp, rotate, then stamp again, however, I did have to reposition the 2nd and third layers a few times, so make sure that they line up perfectly before you ink them. Sometimes the paper you're using might not be perfectly straight and line up perfectly in each corner, so always always double check that it still lines up!
 Next, I cut some cardstock down to 1/4" smaller than my card base so that I could have a little border around my embossed background- I like making the borders match the inks I used in the stamping to tie everything together nicely. I lined up my matching die set and cut out all the stamped images. I embossed the background cardstock with my embossing folders and my Sizzix Big Shot Plus machine (the plus is big enough to run 2 at once- makes bulk processing much quicker!) Then played a while to find combos I liked with the stamped images.
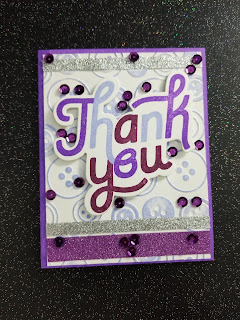
 This example is of finishing the pink card that I made, you can obviously change the colors as you like here! I used my ink pad directly onto my card base to get a saturated border of Ranger Ink's Picked Raspberry. You dont need to ink the whole card- just the edges will be visible!
 Next, for some added color, I inked the embossed background with the Spun Sugar color. To do this, you want to very carefully hold the ink pad flat to the paper, and rub it lightly so that the ink hits the embossed images. These images are raised slightly above the paper, so if you hold the pad lightly enough, it will only ink the embossed images. You may want to practice running the ink padd lightly over an embossed image first, to get used to the pressure you need to use, before doing this for your final card. You don't want to push too hard, or you'll get smeary-looking smudges from the ink pad in the white background.
 This is the final result of the careful ink pad smearing. (Whatever you call it, haha)
 Next, I used foam glue dots to raise the stamped image I die cut, to add a bit of depth and dimension to it.
I use the leftover foam and cut it into strips after I've used all my dots. You'll maximize your money invested into craft supplies this way, and I feel much better using it this way than throwing it out. Nobody sees what's behind, so who cares what this looks like as long as it supports your image anyways?!
 I used my double-sided adhesive tape to adhere the background I made to the card base.
 Then I peeled the backing off all those foam dots and stuck the die on.
 Add embellishments, in this case sequins, and you're done! I contemplated adding a smaller heat embossed sentiment strip to these, but I opted to keep them simple with just the "thank you" sentiment. Change it up, make them different, do what makes you happy! That's all there is to it- you can make tons of color variations and different background combos this way!
Below are more examples and variations of this idea, I hope you like them!
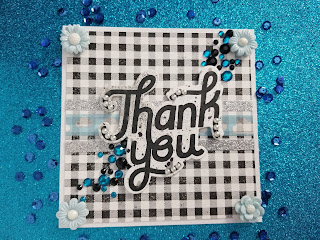
 For this yellow card and the blue one below, I decided to mix it up and do the whole stamped image in solid black, and used my Impression Obsession Gingham background Cover-a-Card stamp to make the background instead of the embossed images I did in this tutorial. Flowers from Queen&Company and some rhinestones and sequins and sparkly washi tape finished off the look!
 The cards below all were done with the exact same process I did for this tutorial, with different color combos and embossing folders.


 This last one is an extra variation you can try- I thought of this as the messier and less perfect version. I like messy crafting, anyways. :) I ink blended a piece of cardstock with a rainbow background, THEN stamped the thank-you image over top and die cut it. I used the same process for the embossed background, but this time, I intentionally got ink on the raised image as well as the white flat part (relief) below. I sprayed some Tattered Angel's shimmer mist over the background, stuck the stamped image on with foam dots, and embellished. I really like the idea of the stamped image having a colored background instead of plain white, too!

 I have to admit: I am a die-hard rainbow fan. I love rainbow things so much, rainbow is always incorporated into my projects somehow. I looked at this stamp and thought, triple-step? Let's make it more complicated. And the rainbow thank you was made! I stamped each letter individually instead of in the three layers that the set came in, following rainbow order.

 I thought pastel vs. Brights would be a really fun way to experiment with the rainbow idea.

 You can see here, I have TONS of thank-you sentiments that I haven't made into cards yet, either, so keep an eye on my Instagram for more of these!


There are so many variations you can make with this stamp and die set- it's amazing!
To make these, you will need:
-White heavy-weight cardstock (whichever you prefer)
-lots of fun colored ink pads, I used my Ranger Ink Tim Holtz Distress Inks and loved how they came out.
-Concord & 9th Triple-Step Thank you stamp and matching dies (Available for purchase here: https://www.scrapbook.com/store/con-10427.html?w=Concord+and+9th+triple+step+thank+you however, I got mine from one of my favorite online craft retailers, Kraftgali. Shes not stocking them any more so I linked to one of my other go-to crafty places!)
-some sort of stamping tool, like the Tonic Studios stamping platform that I have, or a misti. This isnt necessary if you only have stamp blocks but it really improves the effiecency and quality of stamping with this set over all.
-Die cutting machine for the matching die set, not necessary but makes cutting out a bunch much quicker than fussy cutting!
-embossing folders for the backgrounds, I used a variety of "what I already have" folders to change them and add interest to the backgrounds.
-sequins, rhinestones, and whatever other embellishments float your boat for decorating
-glue for your embellishments. I always use Ranger Ink's Matte Collage Medium for it's great hold and completely invisible appearance when dry. You can find it here: https://www.kraftgali.com/collections/ranger/products/tim-holtz-distress-coage-medium-1oz
-paper towels, baby wipes, or a microfiber cloth for cleaning stamps
-double sided tape
-foam adhesive (dots, strips, tape, whatever you have)


I use the leftover foam and cut it into strips after I've used all my dots. You'll maximize your money invested into craft supplies this way, and I feel much better using it this way than throwing it out. Nobody sees what's behind, so who cares what this looks like as long as it supports your image anyways?!


Below are more examples and variations of this idea, I hope you like them!


BONUS CARDS!!


The rainbow cards worked beautifully and I love them!
-Share your ideas in the comments below! Have a wonderful day!


Comments
Post a Comment